


Getting Started with Craft Agents: Turn AI into a Desktop Assistant
A beginner’s guide to Craft Agents: install the app, connect an AI model, choose a working directory, and try three practical tasks with files on your computer.
When a Web Chat Window Is No Longer Enough
If you regularly use ChatGPT, Claude, or Gemini in a browser, you probably know the routine: open a web tab, attach documents one by one or paste content into the chat, get an answer, then copy and paste it back into a Word document or note-taking app.
Web Chat is still convenient for quick lookups, concept explanations, or brainstorming. But real work rarely fits into a single question. Your data is usually scattered across folders, rough drafts, reference documents, and spreadsheets. Constantly uploading, downloading, and copying content back and forth gets tiring.
The problem isn’t that the AI model lacks intelligence. The problem is that the chat window is too far removed from the data on your computer.
From a Chatbot That Answers to an Agent That Works Directly
An Agent in Craft Agents fills that gap. Instead of receiving only the content you paste into a website, it works directly inside a selected folder: reading documents, searching for information, creating files, and editing content within the permissions you grant.
Craft Agents is built around this approach. You create a Workspace to manage configuration, connect an AI model, and let each Session work inside a specific working directory. You don’t need advanced programming skills.
This guide focuses on three things: installing Craft Agents, controlling Agent permissions, and trying three practical tasks with files on your computer.
Three Differences Between Web Chat and a Desktop Agent
Craft Agents differs from Web Chat in three important ways.
1. It Works Directly with Your File System
Craft Agents works inside the project folder you select. Depending on its permissions, the Agent can:
- List files and search for keywords across multiple documents.
- Read notes, data, or source code related to the task.
- Create new files or edit a specific part of an existing file.
What I like most isn’t that the “AI is smarter.” It’s that I no longer have to move data manually between a chat window and a project folder.
2. It Has Tools for Taking Action
A typical chatbot mainly generates answers. An Agent can also call Tools to read files, run commands, process documents, or work with external services.
Craft Agents also supports the Model Context Protocol (MCP). In plain terms, MCP works like an expansion port: connect another Source, and the Agent gains more Tools for working with services such as Google Workspace or GitHub.
This guide focuses only on files stored on your computer. Each MCP Source deserves a separate setup guide because every service has its own connection and authentication process.
3. You Choose the AI Model
Craft Agents supports several ways to connect AI models: signing in with a supported account, using an API key, or running a model locally. You can use a fast model for lightweight work and switch to a more capable one for harder tasks. You’re not forced to send every job to a single provider.
Here’s the basic workflow:
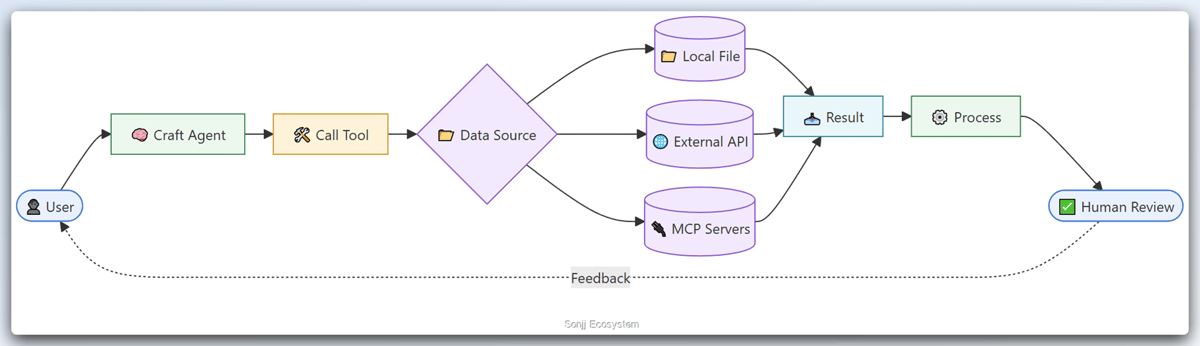
Workflow: User assigns a task → Agent calls a Tool → Tool queries data (Local/API/MCP) → Result → Human reviews and responds.
Your role changes too. You spend less time moving data around and more time defining goals, setting boundaries, and reviewing results.
Set Up Craft Agents in Three Steps
Don’t build an entire automation system on day one. All you need is Craft Agents, one AI connection, and a test folder.
Step 1: Download and Install the App
Open the Craft Agents — Installation page, choose the right installer, and launch it like any other desktop app. Craft Agents currently supports Windows 10+ x64, macOS 11+ on Apple Silicon, and Linux x64. Intel Macs no longer receive new releases starting with Craft Agents v0.10.1.
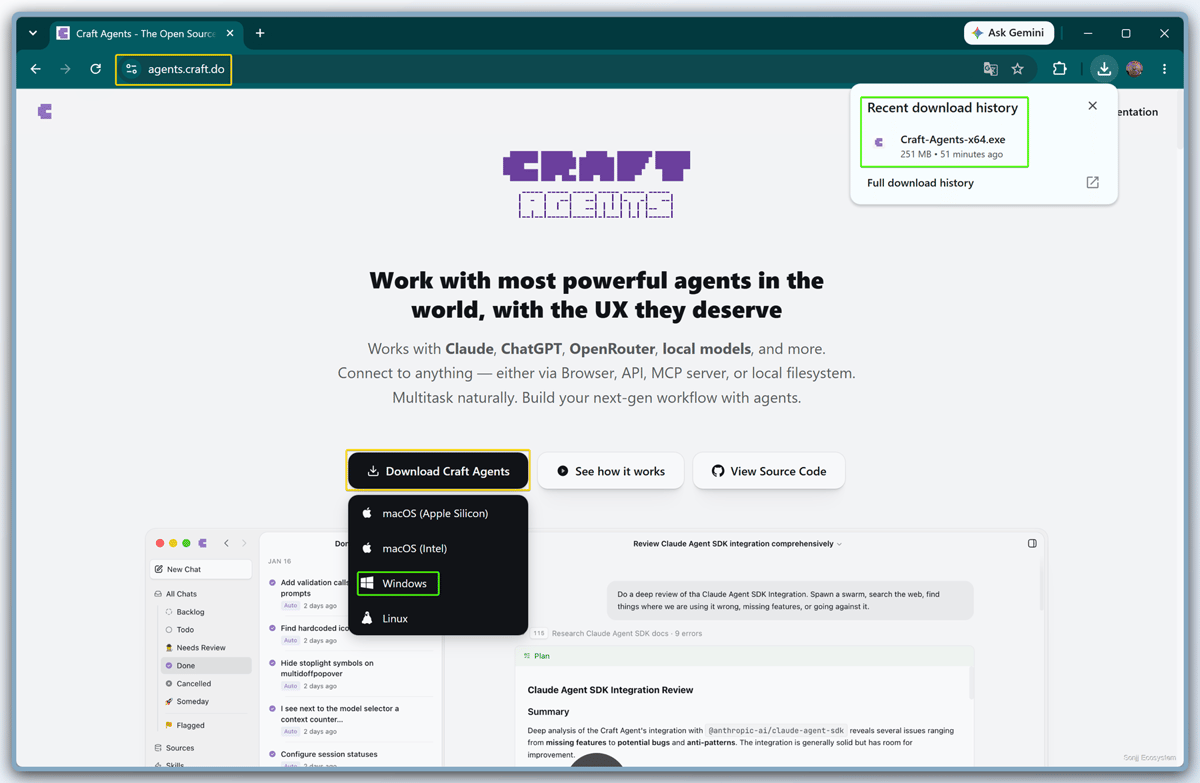
Download Craft Agents for Windows from the official website.
If Windows reports that Git Bash is missing: Install Git for Windows, reopen Craft Agents, and click Re-check. If you don’t see this warning, skip this step.
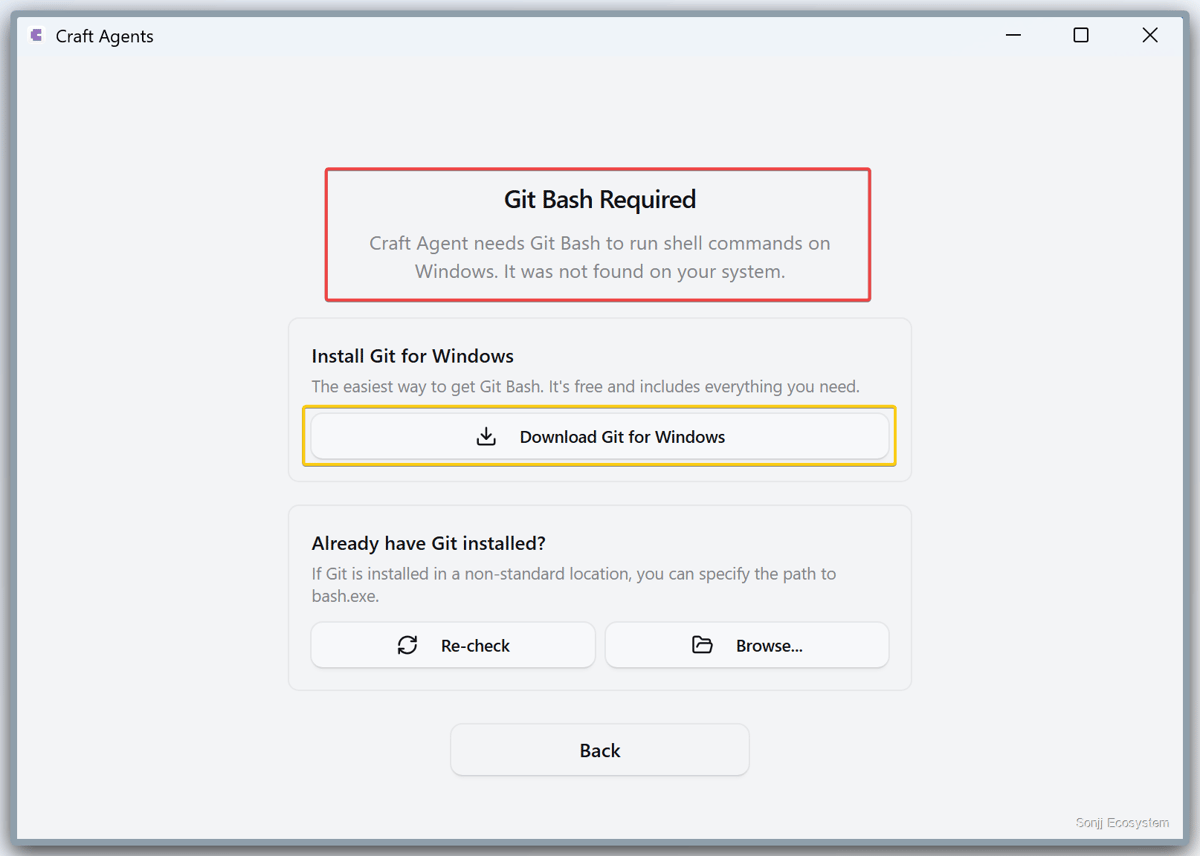
Craft Agents requires Git Bash on this Windows computer.
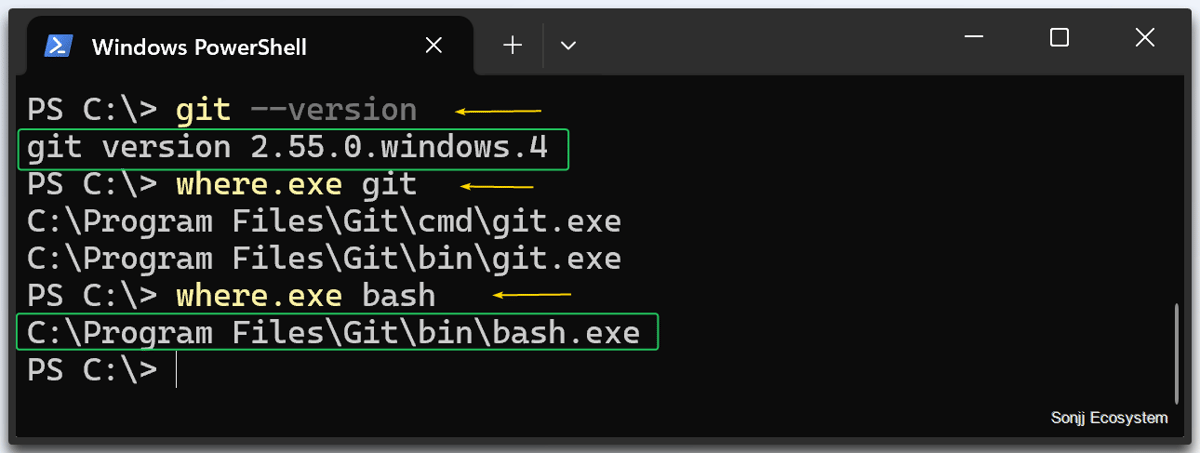
Verify Git and bash.exe before reopening Craft Agents.
If you don’t see the warning, continue. You don’t need to configure an MCP Server, write code, or edit JSON files yet.
Step 2: Connect an AI Provider
Craft Agents supports several ways to connect a model.
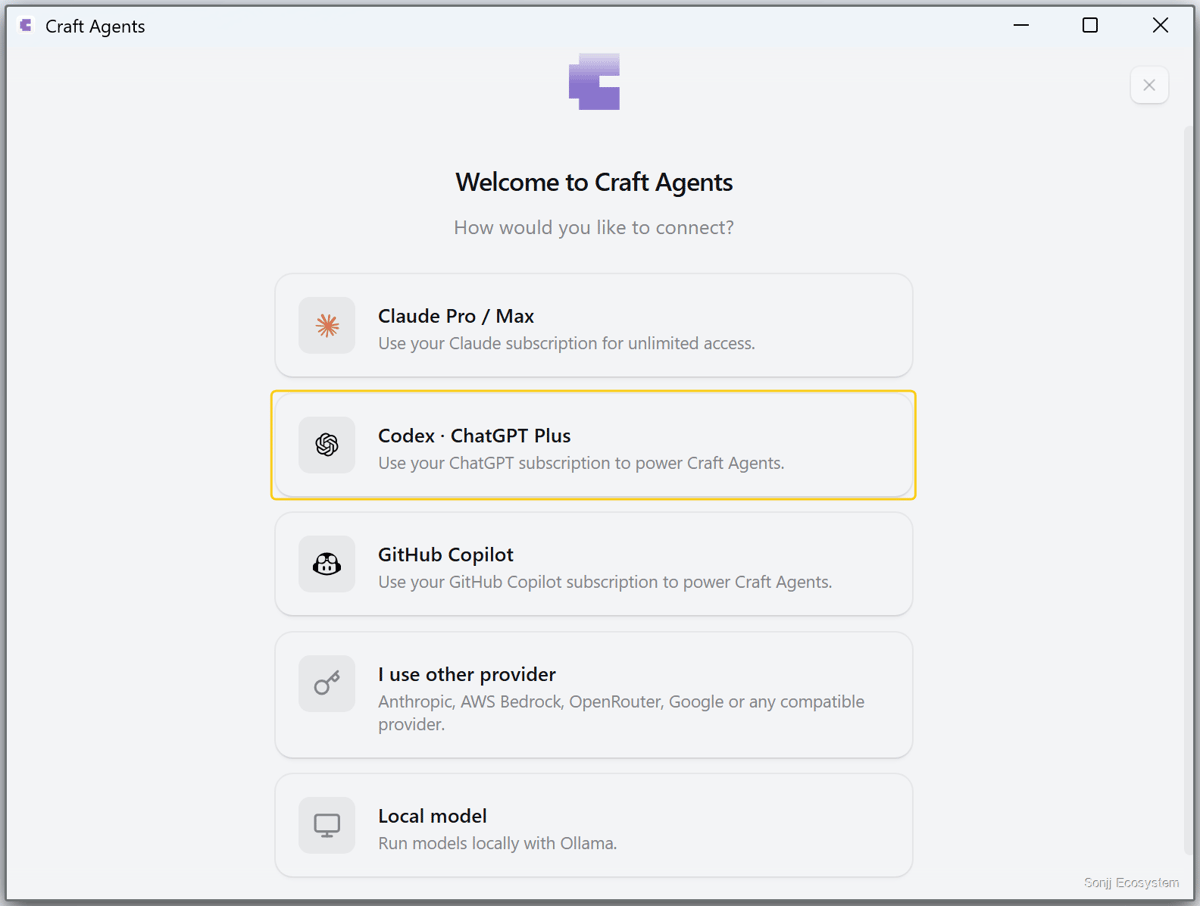
Connect Craft Agents with a ChatGPT Plus account. On the welcome screen, choose “Codex · ChatGPT Plus.” Craft Agents also supports Claude, GitHub Copilot, compatible API providers, and local models through Ollama.
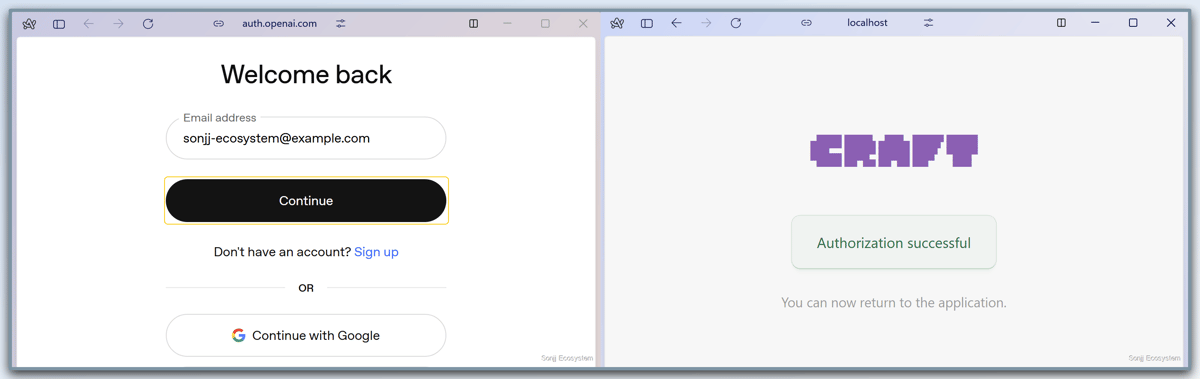
Authenticate your ChatGPT Plus account for Craft Agents. Sign in through the official auth.openai.com page. When the browser displays “Authorization successful,” return to Craft Agents to continue setup.
After authentication succeeds, open Settings → AI to check the connection.
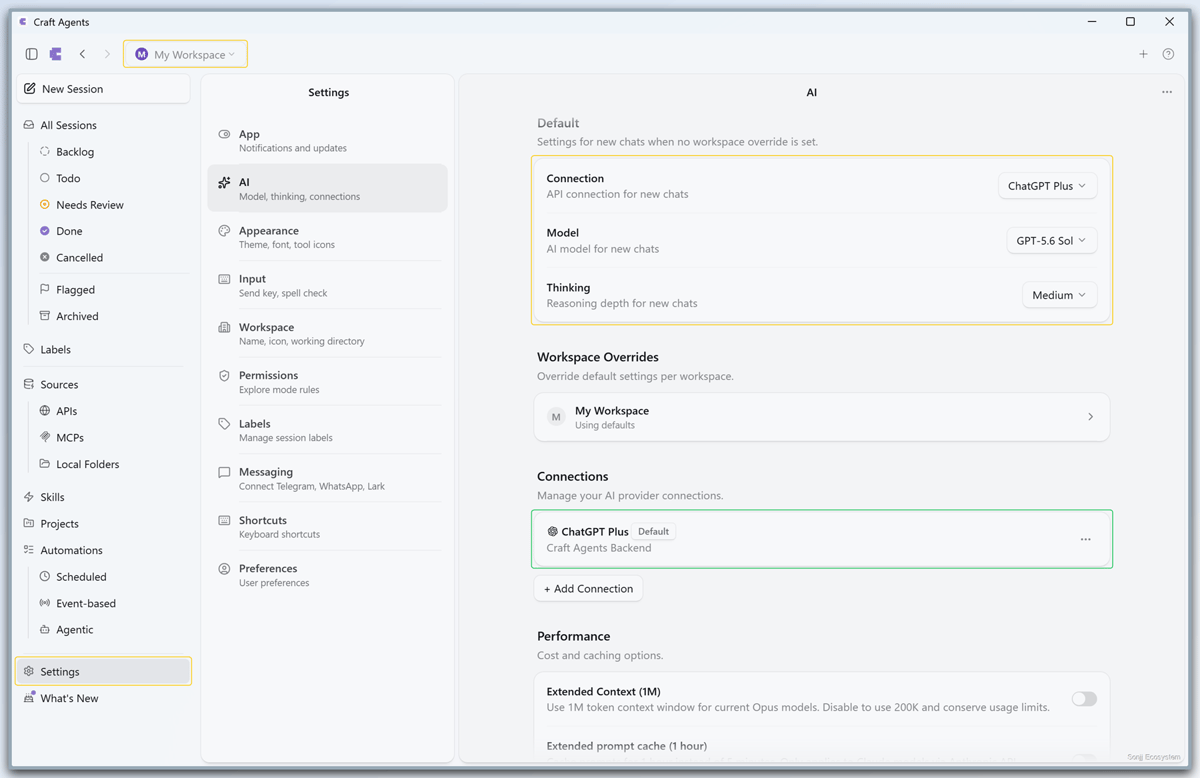
Check the Workspace and connection after authentication. The dropdown at the top shows the active Workspace. In Settings → AI, the Default section defines the connection, model, and Thinking level for new Sessions; Connections confirms that ChatGPT Plus is connected and set as the default.
Don’t confuse these two concepts: A Workspace stores configuration such as AI connections, Sources, Skills, and Automations. A working directory is the actual folder an Agent reads or edits during a Session. They’re related, but they aren’t the same thing.
No ChatGPT Plus? That’s fine. Craft Agents also supports API keys and locally hosted models, depending on the version and provider. Treat an API key like a password: create it only on the provider’s official website, and never expose it in a screenshot, Git repository, or public file.
Step 3: Choose Your First Working Directory
In a Session, click the folder badge near the chat input and select the folder you want to use. This becomes the working directory—the file scope in which the Agent will operate during that Session. To set a default folder for the Workspace, go to Settings → Workspace Settings → Default Working Directory.
For your first attempt, choose a folder containing a few non-sensitive sample files. Don’t point the Agent at your entire home directory or drive. Once the folder is selected, start in Explore mode so the Agent can read and analyze before making changes.
Setup is complete. But don’t grant full access just yet—you need to understand three concepts first.
Workspaces, Sessions, and Permissions
Finishing the setup doesn’t mean you should immediately enable Execute. These three concepts help you understand where the Agent is working, what context it retains, and how much access it has to your files.
Workspace and Working Directory Are Not the Same Thing
A Workspace stores working configuration such as models, Sources, and the default folder. The working directory is the specific folder the Agent reads, searches, or edits during a Session.
For example, you might have one Workspace for content writing and use each article’s folder as the working directory for its corresponding Session. That folder could contain a brief, research documents, drafts, and an AGENTS.md file with project rules. Instead of uploading every file again, you assign a task based on the structure already available in the working directory:
“Read the notes in
research/and identify any claims that still need sources.”
The Agent searches for relevant files before responding.
Sessions: Separate Each Piece of Work
Each Session should handle one clearly defined task: researching a topic, building an outline, or reviewing a draft. Don’t cram everything into one Session. The history becomes easier to follow, and the Agent is less likely to mix up context.
You don’t need a new Workspace for every request. Keep one Workspace for the project, then open separate Sessions for different groups of work.
Permissions: Limit What the Agent Can Do
Craft Agents provides three permission modes that determine what the Agent is allowed to do:
| Mode | What can the Agent do? | When should you use it? |
|---|---|---|
| Explore | Read, search, and analyze files, then prepare a plan; it can’t directly edit project content. | When you’re getting started, reviewing documents, or want to see a plan first. |
| Ask to Edit | Read freely but ask for your approval before making edits. | When you want writing assistance while still approving each change. |
| Execute | Create and edit files and run tools proactively within the granted scope. | When the task is clear and you trust the execution process. |
If you’re new to Craft Agents, start with Explore. See how the Agent reads context and prepares a plan. Switch to Ask to Edit or Execute later when you need it to change files.
More access doesn’t mean less responsibility for you. You still choose the folder, define the boundaries, and decide which changes to keep. For important files, use Git or make a backup before enabling Execute.
Three Practical Tasks with Files on Your Computer
I tested the following three tasks directly in a folder named craft-agents-demo. This is where the difference between Web Chat and a Desktop Agent becomes most obvious.
Task 1: Read Documents and Identify Missing Data
The notes/ folder contains four Markdown files about a content publishing workflow. With Web Chat, I would have to select and upload each file. In Craft Agents, I set craft-agents-demo as the working directory, stayed in Explore mode, and entered this prompt:
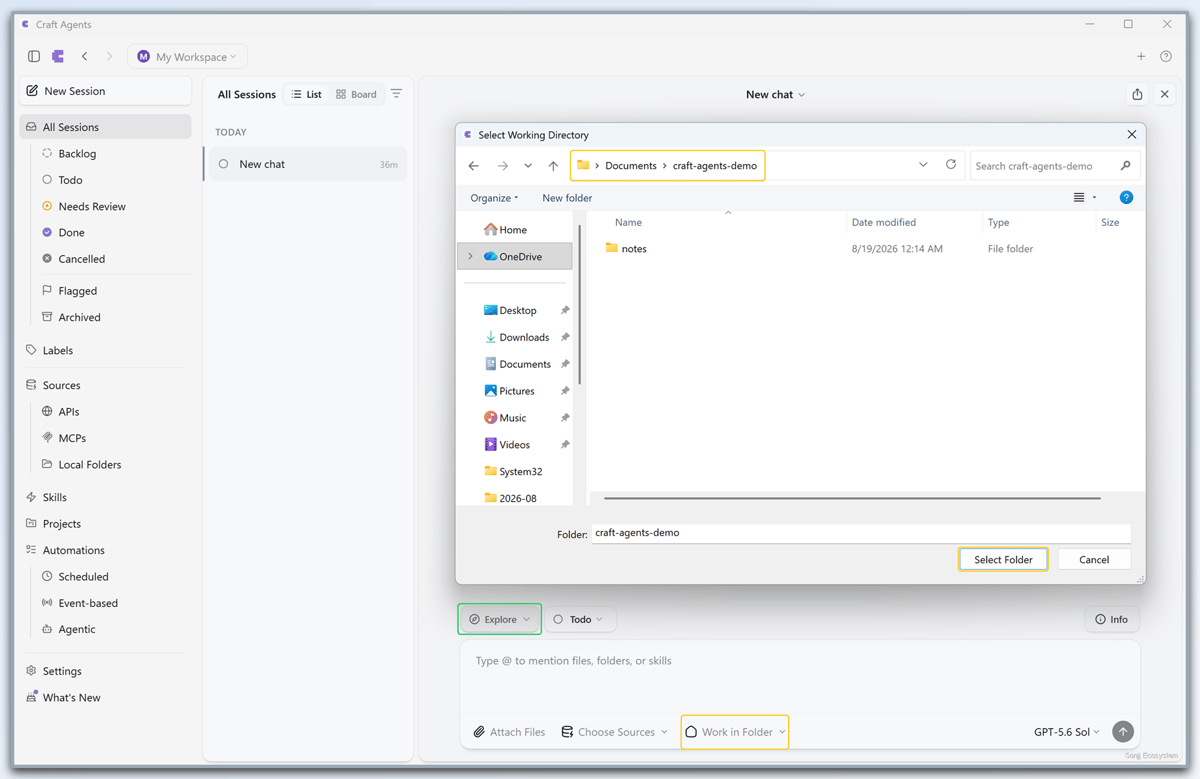
In a Session, open Work in Folder from the toolbar below the chat input, choose the local folder you want to use, and click Select Folder. That folder becomes the Session’s working directory.
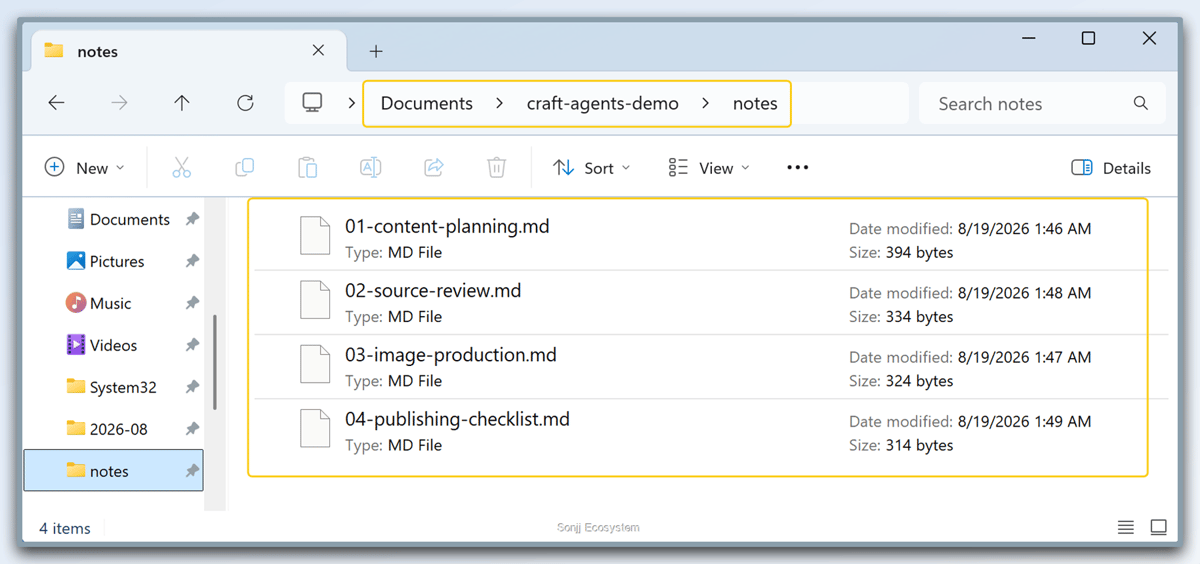
The notes/ folder contains four Markdown files. The Owner field in 03-image-production.md was intentionally left blank to test how the Agent handles missing data.
“Read and review every Markdown file in the
notes/folder. For each file, extract the topic, next action, owner, and status. If the owner is missing, clearly write ‘Not specified.’”
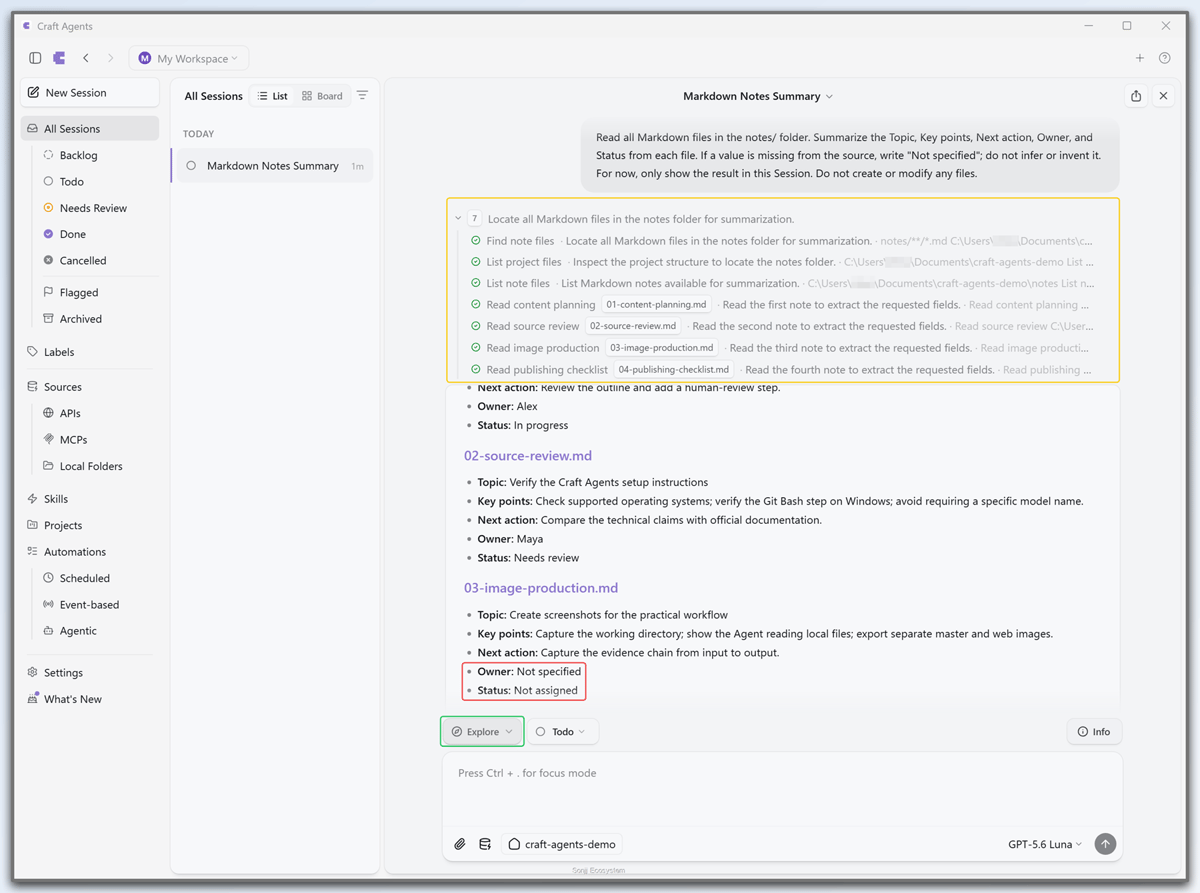
After reading the four Markdown files in notes/, the Agent summarizes the requested fields and writes “Not specified” for the blank Owner field instead of guessing who is responsible. The entire operation runs safely in Explore mode.
The Agent reads the four files and summarizes the results. The final sentence in the prompt matters most: when a field is missing, it must say Not specified instead of guessing. I still verify important tasks, but I no longer need to open and copy every document manually.
The screenshots are preserved from the original test, where the Agent used Not specified for the missing Owner field.
Task 2: Change Permissions and Create a Summary File
After reviewing the summary and confirming that it’s accurate, you can ask the Agent to save the result as a new Markdown file:
“Create a
summary.mdfile in the working directory using the verified results above. Format it as a Markdown table with these columns: source file, topic, next action, owner, and status.”
The Session is still in Explore mode, so the Agent can’t write the file. To create summary.md, I have to switch to Execute and allow it to continue. Only then can the Agent write the file to disk.
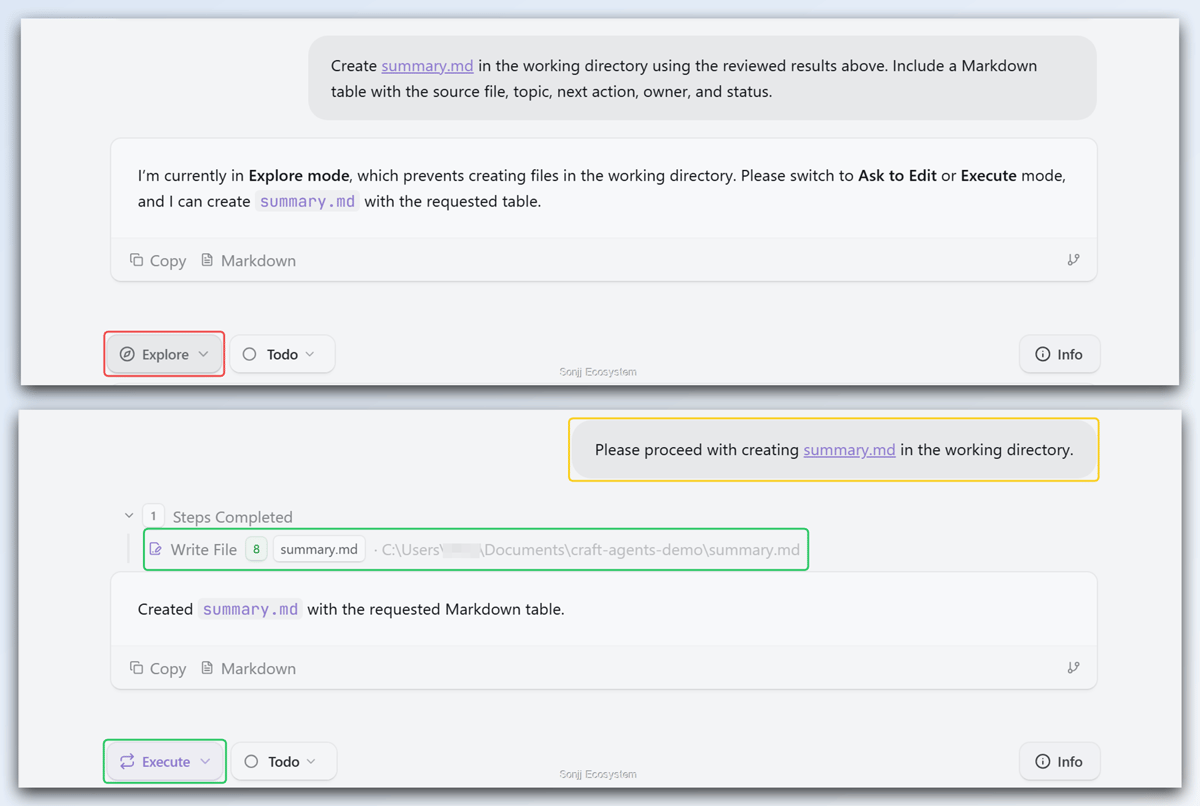
In Explore mode (top), the Agent prepares a plan but is blocked from creating a new file. Only after the user reviews the content and deliberately switches to Execute (bottom) can the system create summary.md.
I don’t need to copy and paste anything to create the file, but the decision remains mine: review the result first, grant permission second.
Task 3: Visualize Data in Place
Craft Agents can display more than plain text. You can ask the Agent to turn the new summary.md file into an interactive table and a workflow diagram that’s easier to follow:
“Read
summary.md. First, display the data as an interactive Datatable with only three columns: source file, owner, and status. Then create a vertical Mermaid diagram (graph TD) showing the four workflow steps in file order. Preserve missing data as ‘Not specified’; don’t add any information.”
The Agent reads summary.md, builds the Datatable, and displays the Mermaid diagram directly in the Session:
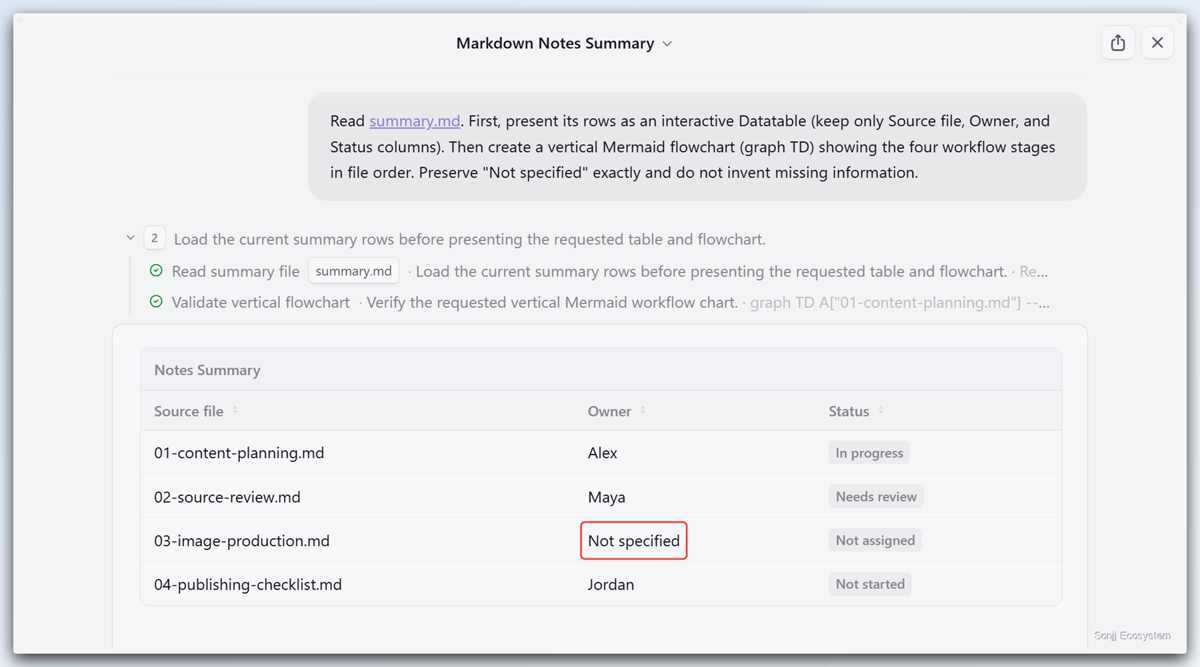
The Datatable presents structured data clearly. “Not specified” remains unchanged from the source file.
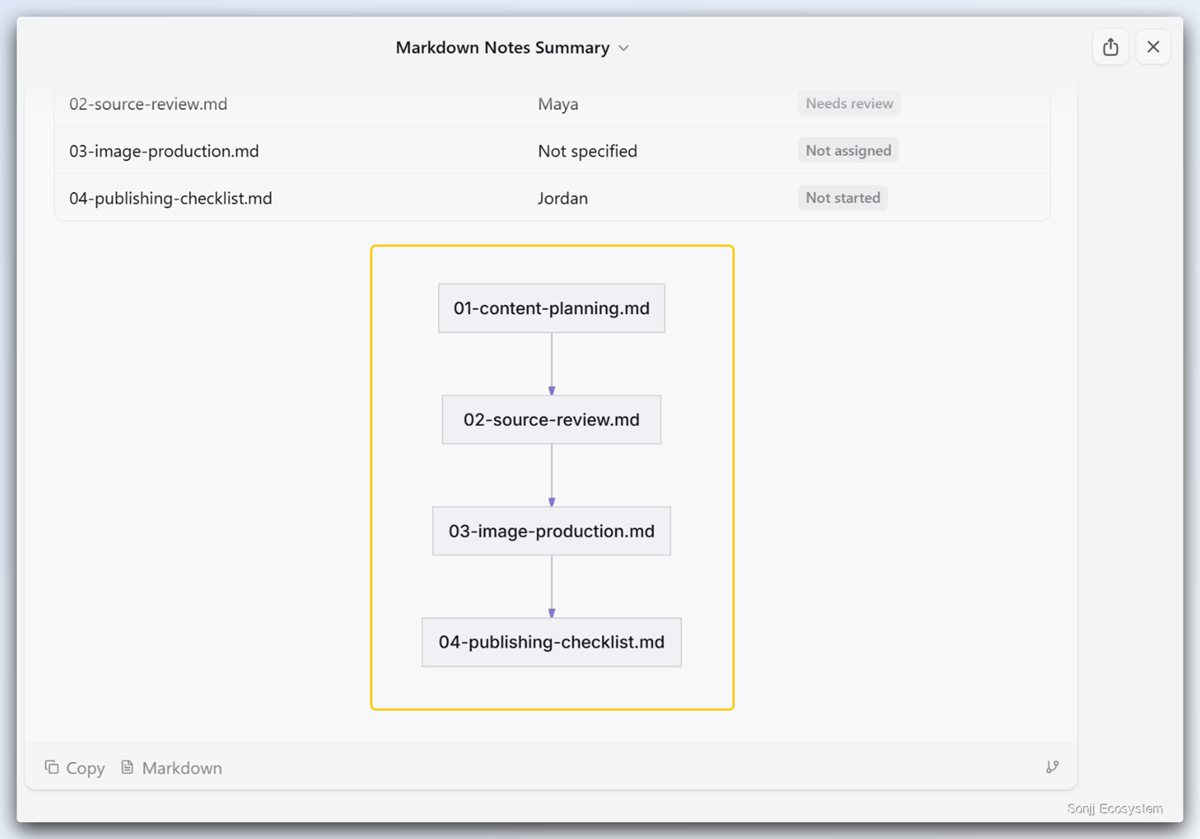
For a multi-step process, a vertical TD Mermaid diagram turns the description into a workflow that’s much easier to follow.
All three tasks follow the same workflow:
Data in the working directory → Agent reads it with a Tool → Human reviews it (Explore) → Human grants execution permission (Execute) → Result is written or displayed in place.
That’s the difference: the Agent doesn’t just answer. It reads real data, asks for permission, and produces a real output.
Start with One Small Task
You don’t need a large automation on day one. Choose a small task with clear input and an easy-to-check result:
- Install Craft Agents and connect an AI model using a method supported by the provider. Depending on the connection, you can authenticate with an account, use an API key, or choose a local model.
- Create a test folder with a few non-sensitive notes or draft documents. Set it as the Session’s working directory and ask the Agent to summarize the content while clearly marking any missing information.
- Ask it to create a simple output, such as a
todo.mdfile containing tasks extracted from the documents. If you’re still getting comfortable, review the result inside the Session before granting edit access.
Once you’re comfortable with the read data → analyze → human review → create file workflow, you can connect more Tools and MCP Sources such as Google Sheets or GitHub. That comes later. Start by assigning one real task and checking the result.
Final Thoughts: From Chatting with AI to Coordinating an Agent
Web Chat is still convenient for quick questions. But when your work spans an entire folder, a Desktop Agent takes away a lot of friction: no uploading and downloading files, no copying answers back and forth, and the result stays inside the project.
AI still doesn’t make decisions for you. The Agent reads documents, summarizes information, creates files, and visualizes results; you define the goal, verify the data, and approve changes.
Start with a small folder, one focused Session, and Explore mode. Once you get used to it, you’re no longer just “chatting with AI.” You’re assigning work to an assistant that can operate directly on your computer.
No spam, no sharing to third party. Only you and me.